I’ve always gotten excited about teaching projects and then realised I had committed too much of myself. That’s basically been my relationship with classroom aquascaping. I began with one simple planted tank 8 years ago and now I’m apparently the guy who rebuilds his aquascapes every summer break like some kind of aquatic interior designer.
Each style I’ve used to create my aquascapes has given me knowledge about either plant biology or ecosystems; however, the most valuable lesson I’ve learned about myself is how far I’ll go with underwater gardens. My wife often makes fun of me and says that I spend more time thinking about my fish tanks than my lesson plans – which is probably true if I am being honest with myself.
So, here are the lessons I’ve learned from creating five completely different aquascaping styles in my classroom over the years (and the spectacular failures that don’t appear in the glossy aquascaping magazines).
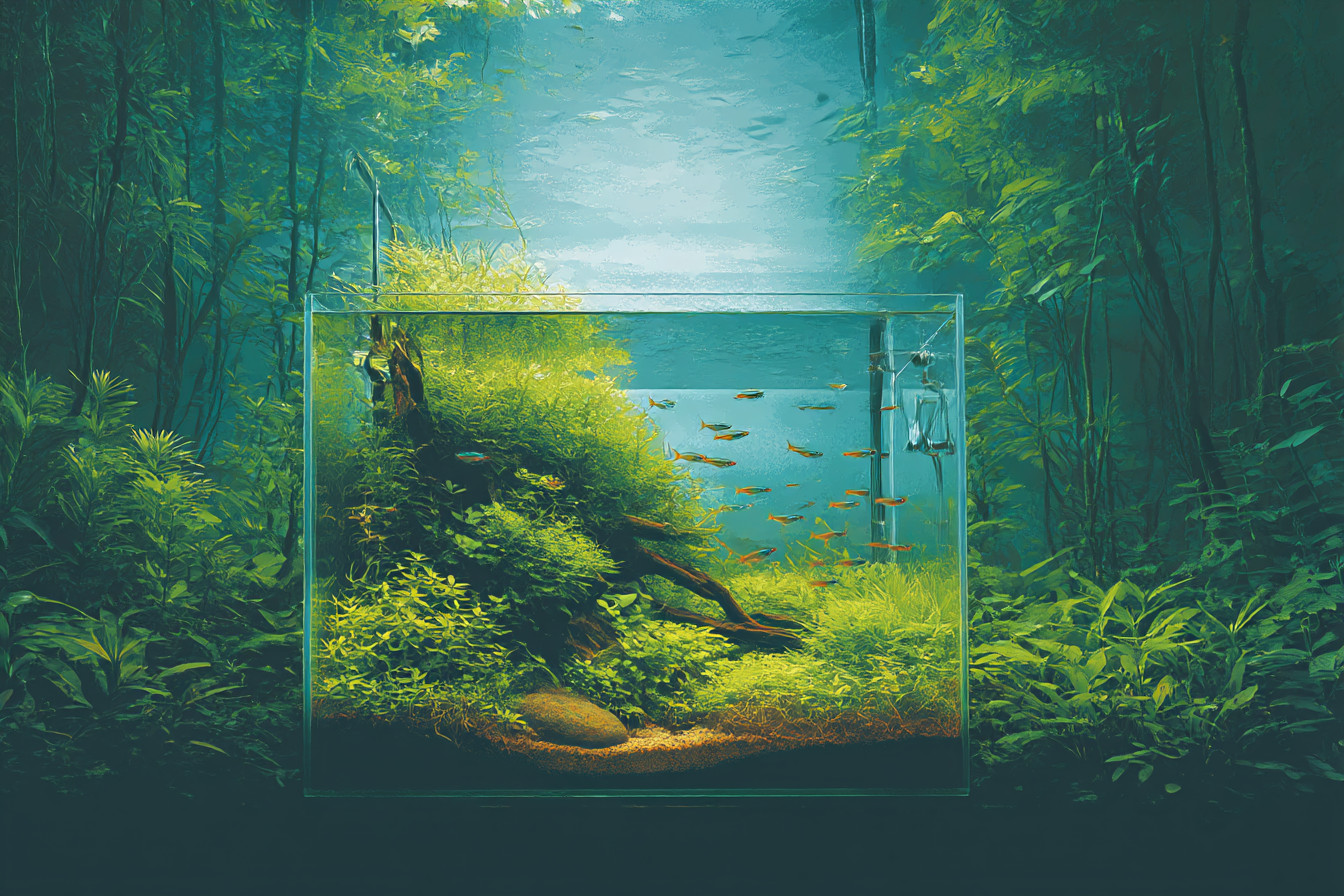
I began with a Nature Aquarium style after finding Takashi Amano’s work during a summer research binge. The basic concept of a Nature Aquarium is to recreate natural landscapes underwater (mountains, valleys, forests) using rocks, driftwood, and plants that provide an incredible sense of size and perspective. It’s like you are shrunk down and walking through an actual landscape, except it’s inside a glass box and needs occasional water changes.
The key to successful creation of these types of tanks isn’t what you might expect. Most people assume that the secret to success is to create something aesthetically pleasing. However, that’s the opposite of the truth. I discovered this the hard way when I created the most boring tank I’ve ever seen during my second year of using this style. All the elements of the tank were perfectly matched – similar leaf shapes, the same green colours, and stones that were clearly related to each other. The kids walked right by it without a second glance.
Nature Aquariums rely heavily on contrasts. You need extreme variations in texture (delicate plants with large leaves, smooth river rocks with coarse, irregular driftwood, dense jungle areas with open areas). The differences help create a sense of movement and cause the student’s eyes to follow the tank and experience that “wow” moment that creates interest in the students’ views.
For an entire summer, I rebuilt my classroom tank using the contrast model. I removed all of my well-coordinated plants and started over using plants that I assumed would have no business being together. Tiny hairgrass with large anubias leaves, small baby tears climbing over large chunks of manzanita wood. Terrible-looking for approximately six weeks, and then all of sudden, it transformed into this incredible underwater landscape that the kids were literally pushing their faces up against the glass trying to see further into.
Another lesson I learned the hard way about Nature Aquariums is managing water flow. I set up a beautiful hardscape without considering the location of my filter output, and then I watched in horror as the “meadows” I had planted were destroyed by the currents. Lost an entire summer’s worth of work one year due to my poorly located filter return and resulting underwater hurricane in the middle of my aquascape.
Now, I consider the placement of equipment before I even begin selecting plants. That was a lesson I paid dearly for.
The style that made me question my sanity is the Dutch-style aquascape. This is the style that utilizes stem plants in large quantities and arranges them in groups with attention to height, colour, and leaf shape. Essentially, it is a perfectly manicured garden where each plant has a designated space and purpose.
I attempted to implement this style in my classroom during my fourth year of my aquascaping obsession. I thought it would be a good way to teach the biology of plants and how plants respond to their environment. I did not anticipate the maintenance requirements of Dutch tanks. Dutch tanks need to be trimmed every single week to maintain the organization of the “streets” of plants and prevent everything from becoming an underwater jungle.
Every Friday after school became aquarium maintenance day for me. I would be in my classroom at 6 PM, scissors in hand, trimming each group of plants, replanting the tops, and removing the old lower stems that had grown long and leggy. The custodian of my building started making jokes about me having a second office in my classroom because I was there so late working on plant maintenance.
While the kids enjoyed watching the weekly transformations, the time required to maintain these tanks was overwhelming. Every Monday morning, the kids would arrive in class and walk into a completely rearranged tank layout and spend the first ten minutes of class observing what had changed. It eventually developed into a fantastic lesson about the growth patterns of plants and how pruning affects plant development, but it was an enormous time commitment.
Lighting is another area where Dutch-style aquascapes present challenges. Dutch-style aquascapes require significant amounts of light to maintain the colours of red plants instead of allowing them to fade to disappointing greens. I installed a light fixture that was likely excessive for my 55-gallon classroom tank, but it caused my red Ludwigia and Rotala plants to glow. Additionally, it gave my classroom a sun-kissed appearance when the lights were operating at maximum strength.
Biotope aquascapes dramatically altered how I viewed teaching ecosystem concepts. Biotope aquascapes aim to replicate a specific natural habitat with geographic accuracy – i.e., only plants and fish that would be found together in nature should be included. Even if plants and fish from different regions would look great together in an aquascape, they should not be mixed.
During one of my summers, I created a biotope that represented a South American tributary of the Rio Negro. The water was dark (tannins), had a high concentration of moss-covered logs, and contained only plants and fish that were native to this region. At first, the water was almost as dark as coffee and the fish were difficult to see.
More than half of my students believed that I had damaged the tank. “Mr. Anderson, the water looks like coffee! Did the filter malfunction?” Once I explained to the students how the biological properties of the water affected the organisms that lived in it and how the biotope I created simulated the exact conditions where these fish evolved, the students gained a tremendous amount of interest. Throughout the rest of the school year, we collected data on pH levels, tannin concentrations, and observed the behaviors of the fish in their “natural habitats”.
This tank became the focal point for a unit on habitat adaptation. The students were able to see how environmental conditions affect the organisms that live in them. In addition, the fish exhibited behaviors in their “native” environment that they had never demonstrated in my previous clear-water aquascapes.
The Iwagumi layout style of aquascape was the most challenging to master. Iwagumi layouts are essentially the minimalist rock gardens of aquascaping – typically three to five carefully placed rocks with a simple plant carpet. Each element within the composition earns its placement.
I spent many hours mastering the technique of placing rocks correctly. In fact, there are actual rules governing how to position rocks in an Iwagumi layout based on Japanese garden design principles. Primary rock, secondary rocks, and accent rocks all serve a purpose in creating visual balance and guiding the observer’s eye through the composition. Simple conceptually until you find yourself on the floor of your classroom at 6 PM moving the same three rocks a fraction of an inch at a time to achieve the desired composition.
One of the biggest challenges with Iwagumi layouts is growing the correct carpeting plants. I lost count of how many times I attempted to grow a perfect carpet of dwarf hairgrass before I finally achieved it. The secret to achieving a good carpet is to aggressively trim the plants from the beginning – even when they are barely established. You need to force the plants to grow horizontally rather than vertically, which is counterintuitive when the plants are establishing themselves.
Lost carpet #2 floated to the surface of my tank one morning resembling nothing more than a green bath mat. The kids arrived in class to see this rectangular “lawn” floating at the top of the tank. Spent the first 10 minutes of class explaining to my confused 7th-grade students why my “underwater lawn” had morphed into a “floating island”.
Jungle-style aquascapes are my guilty pleasure because they disregard all of the composition rules of aquascaping and yet produce something magical. Jungle-style aquascapes are intentionally overgrown tanks where plants are allowed to grow freely, wood becomes hidden beneath moss and climbing plants, and the entire tank has a natural chaotic feeling.
The main difficulty of jungle tanks is controlled chaos. I planned how the plants would grow on top of each other, but I let time do most of the work. On my first attempt at a jungle tank, I planted too many plants and too densely at the beginning of the process, thinking that would allow me to bypass the growth process and establish an overgrown atmosphere.
Three months later, I had a tangled mess with poor water circulation, dead spots where the plants were suffocating each other, and algae in areas where the light could not reach the plants. Started from scratch and learned patience, which is not my greatest asset.
My current jungle tank in my classroom started with approximately half the number of plants I thought I would need. Eighteen months later, it is a dense ecosystem that provides a constant discovery opportunity for the students to locate new hiding places for the fish. The students have started a log of where they see the different species of fish, and it has developed into an ongoing study of habitat use and animal behavior.
What I have learned from developing five totally different aquascaping styles in my classroom over the years is that each style inherently teaches different scientific concepts. Nature Aquariums are ideal for demonstrating ecological relationships and adaptations. Dutch-style aquascapes illustrate plant biology and how plants respond to their environments. Biotopes illustrate the specialization of organisms to their environments and the chemical properties of those environments. Iwagumi layouts illustrate balance and minimalism in natural systems.
However, the thing that nobody tells you about classroom aquascaping is that you will fail. A lot. I’ve had tanks fail during spring breaks, failed due to malfunctioning heaters over weekends, and I’ve had my carefully constructed aquascapes collapse during the filling process. While each failure has taught me valuable lessons about the biology, chemistry, or engineering involved, I have also had my students witness me troubleshooting dying plants, fighting algae blooms, and rebuilding tanks after failures. These experiences ultimately provided some of the best learning experiences for my students because they illustrated real-world problems that required systematic solutions. Much better than textbook problems that have predetermined answers.
Ultimately, the style of aquascaping that will be best suited to any classroom will depend upon the maintenance schedule, lighting arrangement, and concepts that you wish to emphasize. However, to be honest, the specifics of the style matter less than the presence of living, evolving organisms that students can observe over time. These tanks will become ongoing laboratories that illustrate the abstract concepts of science and make them tangible and measurable.
I continue to maintain four separate tanks in my home that I experiment with prior to attempting to implement them with my students. My garage has become an unusual aquatic supply warehouse that my neighbours may view as suspicious. However, finding innovative methods to apply hands-on engagement in the pursuit of science education through aquascaping has been well worth every late evening spent trimming plants and every weekend spent researching the optimal growing conditions for an obscure aquatic species that I probably shouldn’t have purchased online.